Image Post

Swimming and Ankle Bands

Pullbuoys feel great because they help you float nicely in the water. Paddles immediately let you know that you’re working harder and increase your distance per stroke. Everybody is happy to use these 2 tools because they enhance the feel for efficiency in the water.

But everybody hates swimming with an Ankle Band.

Just try getting a class to strap on ankle bands and many swimmers feign ignorance, “What’s that? What’s it for? What does it do? Where can I get one?” or conveniently ‘leave them at home’ – every single week.

The humble ankle band is easily the most under-rated and unloved swimming tool out there because swimming with an ankle band is tough. Many athletes don’t even get to half way across the pool before deciding ‘That’s not for me.”  That’s because swimming with a band feels crap at first, and may continue to do so unless you take the time and put in the effort to appreciate how it’s supposed to help you swim better.  So read on…

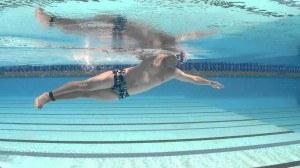
The first time you try one on you’ll feel as though you might drown because tying your legs together makes you drag your legs and bum around like this:


ankle bands


But forcing you into a counter -intuitive position of poor body balance is good for you. Here’s why:

1) Increased awareness of body position –

When you start swimming with an band you will find your bum and legs trawling through the water. It feels TERRIBLE and INEFFICIENT and a total waste of energy. This is because by binding the feet together, you have effectively removed the propulsive and counter balancing effect of your kick. This causes your lower body to sink deeper into the water putting you in the worst possible position for swimming.

After struggling through the 1st few laps and realizing that you’re not going to drown, keep an open mind and start to experiment with ‘pressing the T’ into the water. The “T” is the the cross junction formed by the vertical mid-line of your torso and the horizontal line that runs across from shoulder to shoulder. To swim even a little efficiently in the water with an ankle band, you really need to exaggerate the pressing of your chest and shoulders into the water. It is an unnatural sensation that takes getting used to,  but once you get a feel for it, you’re well on your way to achieving a better position in the water.  Once you are able to apply pressure ‘into’ the water with your upper body, replicate this sensation when swimming without the band and you’ll be pleasantly surprised how much better balanced you will be in the water.

2) ‘Syncs’ the upper and lower body –

Secondly, using the band regularly engages the core muscles in the trunk to ‘connect ‘ the upper and lower halves of the body so that you learn ( out of necessity ) how to  rotate as one single and united vessel. If you pay attention to the feel of swimming with a band, you’ll start to understand what it means to drive the rotation ‘from the hips’. In order to rotate in even a slightly efficient manner with the band on, your trunk and hips, bum and legs all need to turn at the same time and at the same speed, kind of as if you were a chicken on a satay/ lamb on a spit.

The simple ankle band does a great job of making you more aware of your balance and rotational inadequacies. So unlike the other above-mentioned tools, that you just stick on and let them do the work for you, the ankle band requires more focus on the ‘feel’ of how you are moving through the water AND the willingness to experiment with the smaller details of your technique to get them just right.

I find that the band has helped significantly to sync the timing of my rotation with the pulling arm so that I am moving more as a single and powerful unit through the water and displacing more water with each pull as a result of that. This ‘connection’ between your upper and lower body will also reduce the amount of side to side ‘snaking’ from the rear end.

3) Improves strength –

Finally, the increased resistance that a sinking bum and legs produce is a fantastic but totally crude way, of swim specific strength training. Try it!

So PLEASE, make an ankle band up from an old goggle strap or punctured inner tube and leave in your kit bag as a permanent resident. You will struggle and wrestle with it at the start but persevere and keep an open mind, pay attention to the ‘feel’ and you will be rewarded with an intuitive awareness of your body position in the water and the skill to fine tune your overall swimming technique.

Getting started:

1) Use the ankle band with a pullbuoy to start with.

2) Don’t worry about your speed, focus on keeping the effort easy and finding that sweet spot of balance. This should be your 1st priority

3) Only build intensity after you have gotten comfortable with the band. This will come naturally if you are paying attention to 2)

4) A good place to introduce band work is right at the start of your swim session as part of your warm up. It could be as simple as 5 x 100 easy with pullbuoy and band.

5) Progress to longer continuous intervals with the band as your ability dictates.

Enjoy your training!

Coach Shem Leong

Train with ironguides!

Personalized Online Coaching:  Starting at USD190/month

Monthly Training plans (for all levels, or focused on one discipline): Only USD39/months

Event based training plans:

Sprint Distance (USD45 for 8-week plan)

Olympic Distance (USD65 for 12 week plan)

Half Ironman (R$95 for 16-week plan)

Ironman (USD145 for 20-week plan)

X-Terra (USD65 for 12-week plan)

Running Plans (10k, 21k and 42k – starting at USD40)


Image Post

A Beginners Guide to Triathlon Run

As triathlon is viewed largely as an endurance sport, many beginner triathletes like to cover the distance of the run portion of their triathlon at an easy steady pace. While there is definitely a place for the LSD ( Long Slow Distance) in every triathletes schedule, the best thing to do with the other run training slots is to mix up the your effort  levels in a structured way so that the other physiological systems of the triathletes body can be developed as well.

If an athlete currently run 3 times a week – 3km , 5km and 10km, all at the same easy to moderate pace then yes they will indeed develop the endurance to simply cover the distance. However, this ‘safe’ approach to training will not work as the athlete wants to improve their speed.

The ONLY way to improve run performance is to develop the other important physiological systems of strength, leg speed and tolerance.

Strength – Simply put, “Stronger is stronger”.  A stronger athlete will be able to hold their form later into the race. This means they will be able to running efficiently for longer. A stronger athlete will also be able to take longer strides, covering more ground with each step. This translates to a faster run.  Stronger athletes also typically hold up better to the rigours of training. As they develop strength, they are able to push harder without getting injured. An athlete can build strength in a number of ways;

a)      Hill Repeats: After a full warm up of 20 mins easy building to moderate running, run up a steep hill as hard as you can for 40 seconds. Your legs should be burning by the end of that effort and our heart may feel as if it is about to jump out of your chest. Turn around, walk back down and repeat 10 x. Cool down at the end with a very easy 10 min jog.

b)      Static exercises: Squats and Lunges are the basic exercises that build run specific strength. They develop Gluteal and Quadricep strength. After learning how to execute them correctly, advanced versions include single leg variations, weighted variations, Swiss Ball Variations and more explosive plyometric exercises. However, the simple squat and lunge combo is a great way to build strength in the legs.

Leg Speed – Leg speed refers to the ability for a triathlete to turnover a high stride rate while running. Efficient running starts at a stride rate of 90 steps per minute and this is a key factor that will allow one to run off the bike well. Typically, athletes who are not aware of their stride rate, especially taller ones,  may come in anywhere between 78  – 86 steps per minute. To measure your stride rate, simply count the number of times your right elbow drives backwards in a 30 sec window while you are running at your regular pace. Then multiply this number by 2.

As a drill, I get my runners to focus on driving their elbows back and forth at an exaggerated higher rate while running for short bursts. Performing this drill once week will develop their stride rate:

A)     Jog 20 minutes to a nearby track as your warm up.  Run with as fast a stride rate as you can for 60 – 80m along the straight. This is NOT an all-out sprint. You may end up running quite fast, but remember that top end speed is not the goal of this drill. Focus instead on running tall and driving your elbows quickly. Your may find that your stride naturally shortens and becomes more compact – this is fine. You are also retraining your feet to strike the ground under your hips, which is another important trait of efficient running. At the end of the effort, jog back easy to the start and repeat the Fast Strides 15 – 20 times. Finish with an easy 10 minute jog to cool down.

B)     Doing this drill on a treadmill is also very useful because the treadmill at 0% gradient actually drives the leg turnover. You will need to master the skill of jumping off on to the side platforms to take your rest though!

Tolerance – This refers to the ability to hold a moderately hard effort for an extended period of time – a useful skill to have at any distance of race!  Here is simple tolerance set that you can try out on the road/ at the track or even on the treadmill.

A)     At the track, after warming up, do 12 – 15 x 400m with a 30 – 45 sec rest after each lap. Do not go flat out. Instead, aim to run all of these at the best possible pace that you can sustain over all the repetitions. Your goal is to run the 1st one, middle one and last one at the same speed. Be warned, this session is designed to get tougher and tougher as you progress through the reps. You may need to take an extra 60 seconds at half time to catch your breath. It will take a few weeks to master this set but by the time you nail it, you’ll already be running better!

B)     You can easily replicate this session on the road by running moderately hard for 2 mins with a 30 – 45 sec walk break after each one. Aim to keep the same ‘best average’ pace for all reps.

So there you have it, this should be plenty to get started on. The next time you head out for a run, I challenge you to do any one of these sets and mix it up! Stick with it for 3 -4 weeks and you’ll feel the difference in no time at all.

GOOD LUCK & ENJOY YOUR TRAINING.
Shem Leong

Train with ironguides!

Personalized Online Coaching:  Starting at USD190/month

Monthly Training plans (for all levels, or focused on one discipline): Only USD39/months

Event based training plans:

Sprint Distance (USD45 for 8-week plan)

Olympic Distance (USD65 for 12 week plan)

Half Ironman (R$95 for 16-week plan)

Ironman (USD145 for 20-week plan)

X-Terra (USD65 for 12-week plan)

Running Plans (10k, 21k and 42k – starting at USD40)


X

Forgot Password?

Join Us